DIY Sound Diffusers FAQ
Here are answers to the most frequently asked questions about the Arqen DIY sound diffusers. If you’ve not yet grabbed the blueprints, you can download them for free here. For more information about these designs (and acoustic diffusers in general) visit the sound diffusers 101 page or download the diffuser design report.
Top Frequently Asked Questions
- I don’t have access to 10 mm stock material. How can I build these DIY diffusers using standard size imperial plywood or lumber... and make them line up with my wall studs?
- I don’t have space for the recommended 5 or 7-panel arrays. How can I mount 3, 4, 6 or more diffuser panels? How about 11 or 15 panels?
- What’s the minimum listening distance for these diffusers? How far away from them do I need to sit to hear proper acoustic diffusion?
- How high should I mount these diffusers on my wall?
- Do I get any benefit by mounting diffusers high on my wall, above the listening plane?
- What’s more important in my control room: absorption or diffusion?
- I want to build a sound diffuser that’s easy to make but performs well. What diffuser do you recommend building?
- I want to build a fractal diffuser. What design do you recommend building?
- Why don’t these stepped diffusers have fins like QRD diffusers? How are they different?
- How do I measure the performance of my own DIY diffuser design using AFMG Reflex?
Stepped diffusers based on imperial dimensions
I don’t have access to 10 mm stock material. How can I build these DIY diffusers using standard size imperial plywood or lumber? How can I make them line up with my wall studs?
The imperial version of the Leanfuser™ design is simple.
[1] Just use 1/2" stock material, and keep the well widths approximately2 the same as the metric version. In other words, 1/2" standard material (typically 12.3-12.7 mm actual thickness) is used as the step size (unit of depth) instead of 10 mm material.
We've tested the diffusion performance and this imperial version performs slightly better than the original, even though the proportions are different.
[2] (Optional) If it makes it easier for you to mount them, you can make the diffuser panels 16" wide (406 mm instead of 420 mm). This way they will line up with wall studs that are 16 inch on center. To do this, make each well 58 mm (2 9/32") wide instead of 60 mm (2 6/16").
The best ways to mount diffuser panels: profiled modulations
I don’t have space for the recommended 5 or 7-panel arrays. How can I mount 3, 4 or 6 diffuser panels? How about 11 or 15 panels?
For maximum diffusion performance, you should always mount Leanfuser™ (A1-LF) or Leanfractal™(A1-Frac) panels using a profiled modulation. This is a system of mounting modules at varying depths to minimize periodicity in the array. Profiled modulations for 5 and 7-panel designs are given on the final pages of the A1-LF diffuser plans.
If you don’t have space to build a 5 or 7-panel version of the Leanfuser™, here are some alternatives.
Mounting 3 Diffuser Panels
Here's one way you can mount three Leanfuser™ or Leanfractal™ panels: Mount the center panel so it protrudes an additional 7 or 8 cm from the wall when compared to the side panels.
Various three-panel configurations were tested by OttoPus in the Gearslutz forums. After assessing the diffusion coefficients we found that the 7 cm version has (very slightly) better performance at 1 kHz, and slightly more even diffusion with respect to frequency. But, the 8 cm version has better low frequency diffusion. It also has (very slightly) better performance at 1.6 kHz (and very slightly worse performance at 1 kHz).
The following diffusion coefficient measurements assume absorption on either side of the diffuser. It won't scatter as uniformly if it's flanked by a hard wall on either side.
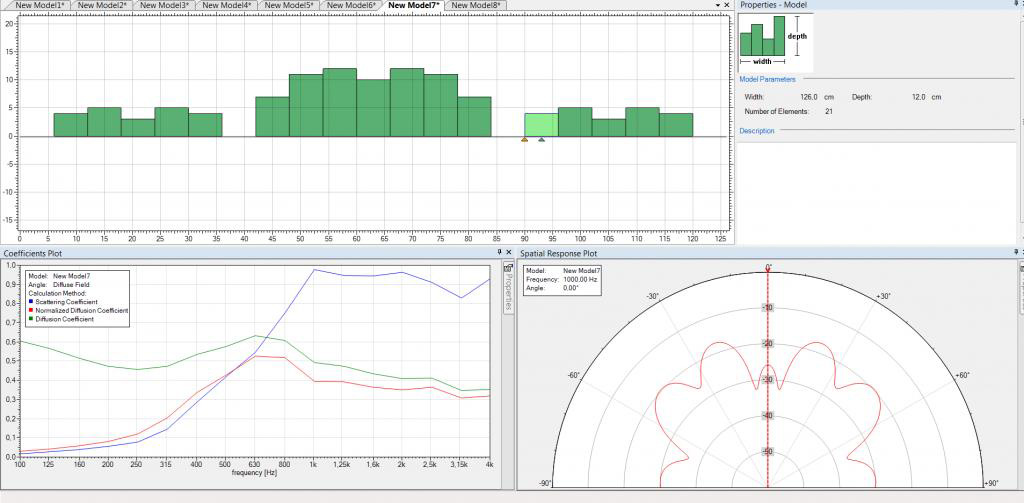
Diffusion coefficients for 3 Leanfuser™ panels in profiled modulation (center diffuser panel protruding an extra 7 cm).
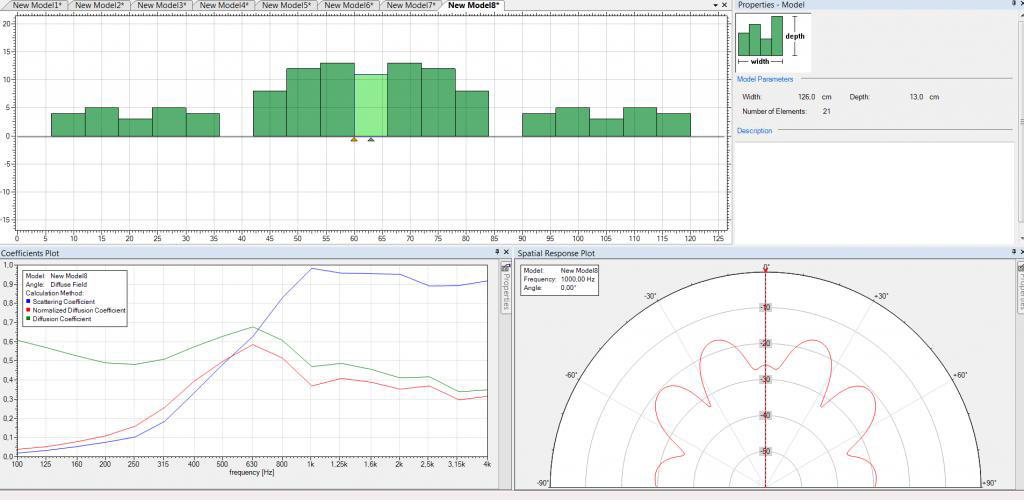
Diffusion coefficients for 3 Leanfuser™ panels in profiled modulation (center diffuser panel protruding an extra 8 cm).
Technically I would consider the 8 cm version to be slightly better from a performance standpoint, but the difference is not very significant. Of course, there may be better 3 panel configurations out there, and you can help us find them…
If you download the demo of AFMG Reflex (here’s a tutorial on how to use it), you can do one last experiment to find the best 3 panel configuration: Keep the center panel sticking out 8 cm and run diffusion simulations with the side panels raised 1 cm, 2 cm, 3 cm, 4 , 5 cm and 6 cm.
That should reveal the best 3 panel configuration (that has a total depth < 14 cm). If you decide to do this experiment, please share your results with the community in the forum here. You rock!
Mounting 4 or 6 Diffuser Panels
Now we’re entering unknown territory. We’ve not yet tested configurations of 4 or 6 diffuser panels. Without doing any testing, the most intuitive way to mount them would be so that the overall diffuser forms a convex arc.
As a starting point you could come up with configurations that approximates a convex arc, and test the performance.
For 6 panels, you could start by testing the following configurations (mount each panel according to one of the depth sequences below):
[0, 5, 6, 7, 5, 0] cm
[0, 7, 10, 9, 7, 0] cm
[0, 8, 10, 11, 8, 0] cm
The six numbers in each array are a profiled modulation. They represent the distance from the wall to the base of each diffuser panel.
For 4 panels, start by testing the following profiled modulation:
[0, 5, 6, 0] cm
Before you build any of these designs you should test them. Download the demo of AFMG Reflex and use these setting to simulate the diffusion performance.
You can then systematically vary the mounting depth of each panel by trial and error. If you decide to do this experiment and you discover a design that performs well… congratulations! In the spirit of open source design, I’d encourage you to share your findings with the community here. Whether the diffusion performance is good or bad, new knowledge is always valued!
Mounting 5 or 7 Diffuser Panels
See the final pages of the A1-LF blueprints for profiled modulations using 5 and 7 panels. Images of these configurations are shown below.
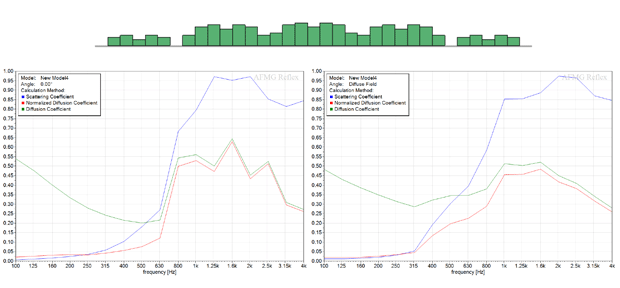
5 Leanfuser™ panels mounted at specific heights in a profiled modulation. Diffusion coefficient spectra shown below.
The 7-panel profiled modulation can be called a fractal modulation because it's based on fractal self-symmetry. This is explained in detail in the Leanfuser™ construction plans. Like all the profiled modulations this one can also be applied to the Leanfractal™ (A1-Frac). If you use this fractal formation with Leanfractal™ panels, the result is a 3rd order fractal diffuser.
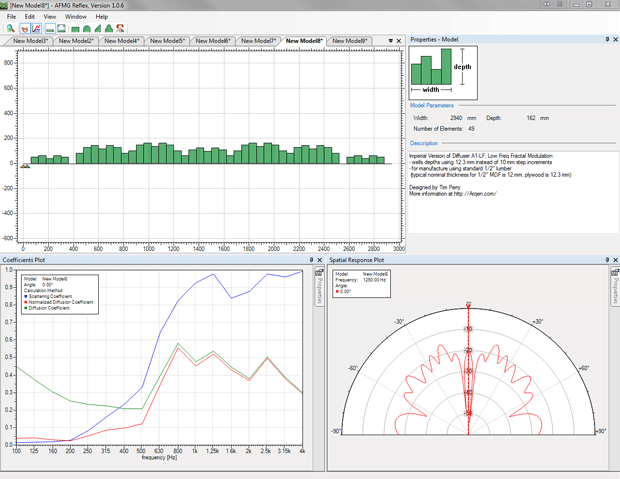
7 Leanfuser™ panels in a fractal modulation. Diffusion coefficients shown for a sound wave at normal (0 degree) incidence.
Mounting 11 or 15 Diffuser Panels
To arrange 11 diffuser panels I recommend using the 7-panel fractal modulation in the center, with a 3-panel modulation on either side. 3+7+3 = 13, but two of the zero-depth panels can be shared / superimposed, bringing the total panels to 11.
Here's what I mean. The overall depth profile for mounting the 11 panels would be:
[0, 7, 0, 8, 10, 6, 10, 8, 0, 7, 0] cm
This seamlessly blends three performance-tested diffuser arrays and it maintains left-right symmetry. It works out very nicely!
The same concept can be applied to arrange 15 diffuser panels. This time you would use a 7-panel modulation in the center, with a 5-panel modulation on either side. The depth profile for mounting the 15 panels would be:
[0, 5, 6, 5, 0, 8, 10, 6, 10, 8, 0, 5, 6, 5, 0] cm
Note that we have not run sound diffusion coefficient tests on any large arrays of diffuser panels. There are probably better ways to configure 15 panels, we just don't know them yet.
What’s the minimum listening distance for these diffusers?
At what distance am I sitting too close to my diffusers?
If you sit too close to diffusive surfaces you may hear audible artifacts such as near field comb filtering. In listening rooms, control rooms and other small music rooms, listeners should ideally be positioned as far away as possible from the diffusers (or any acoustic scattering surface).
I don’t encourage the use of sound diffusers in a small room unless you plan to be sitting outside the minimum listening distance.
Based on a guideline for QRD diffusers, I consider the a safe minimum distance for critical listening to be about 3 times the longest wavelength diffused. Bear in mind that this math is more of a guideline than a hard rule.
Depending on how you configure these DIY stepped diffusers, the minimum critical listening distance ranges from about 7-10 ft.
However, people have reported listening to these stepped diffusers at closer distances without hearing acoustic distortion.
If you don't have much space, you are probably fine at 1.5 times the longest wavelength diffused. Take this as an absolute minimum listening distance. If you're much closer than this to your diffusers there is not enough space for the lower frequency waves to fully form and disperse. You would likely hear phasing anomalies (typically, "phasey" sounding distortions caused by near field comb filtering).
Most acoustic diffusers used in recording studios and listening rooms have a minimum effective diffusion frequency between 300 – 500 Hz. This corresponds to a safe critical listening distance of about 3 m, or 10 ft (using the 3x rule), and an absolute minimum listening distance of about 1.5 m, or 5 ft (using the 1.5x rule).
Since we know the diffusion coefficients for our diffusers, we can get more specific.
Min Critical Listening Distance for the Leanfuser™ & Leanfractal™
For 5 Leanfuser™ or Leanfractal™ panels arranged periodically, with no profiled modulation (not recommended), the minimum effective diffusion frequency is about 500 Hz. This corresponds to a wavelength of 0.68 meters; therefore, the minimum critical listening distance guideline is:
3 x 0.68 m = 2.04 m = 6’-9" (for 5 A1-LF panels arranged with no profiled modulation)
For 5 Leanfuser™ or Leanfractal™ panels arranged with the recommended profiled modulation (shown near the end of the blueprints), the minimum effective diffusion frequency is about 400 Hz. This corresponds to a wavelength of 0.86 meters; therefore, the minimum critical listening distance guideline is:
3 x 0.86 m = 2.58 m = 8’-6” (for 5 A1-LF panels arranged with the recommended profiled modulation)
For 7 Leanfuser™ or Leanfractal™ panels arranged with the recommended profiled modulation (shown near the end of the blueprints), the minimum effective diffusion frequency is about 350 Hz. This corresponds to a wavelength of 0.98 meters; therefore, the minimum critical listening distance guideline is:
3 x 0.98 m = 2.95 m = 9’-8” (for 7 A1-LF panels arranged with the recommended profiled modulation)
As you apply deeper profiled modulations, the overall diffuser becomes deeper, and the minimum critical listening distance increases.
Min Critical Listening Distance for the Stepfractal™
For 5 Stepfractal™ panels arranged with the aperiodic modulation [1 0 1 1 0], the low frequency limit is about 400 Hz, which corresponds to a wavelength of 0.86 meters. Therefore the minimum critical listening distance guideline is:
3 x 0.86 m = 2.58 m = 8’-6” (for 5 B2-Frac panels)
How high should I mount these diffusers (or other acoustic panels) on my wall?
If it's a room where people will frequently be sitting while listening, I suggest mounting your diffusers so the middle is about 145-148 cm (57-58") above the floor (based on the recommended height for mounting studio monitors). This way they will be useful for people both sitting and standing. You can use this guideline for acoustic treatment panels in general.
If it's a large room, or a room where people will only be standing, you can mount your acoustic panels higher. For example, the middle of the diffuser could be mounted at ear level while standing (E.g., that's about 165 cm (65") above the floor for a 5'-9" tall person).
While 1D diffusers are perfect for mounting behind you in the plane of listening, high up on the back wall 2D diffusers are usually preferred as they scatter sound in both the horizontal and vertical plane.
Do I get any benefit by mounting diffusers high on my wall, above the horizontal listening plane?
Like absorption, diffusion can be used as spot treatment by placing it exactly where it's needed to treat a reflection. In this usage it provides early reflection control while simultaneously adding a sense of airiness or spaciousness. But let's consider another indirect effect of diffusion: it enhances the quality of late reverberation (the reverb tail, or ambience in your room).
1-dimensional diffusers (like the Leanfuser and Leanfractal) scatter sound in one plane. If you mount them high on your wall you typically want to orient them to scatter up and down in the vertical plane (or better yet, use 2D diffusers high on your walls)... but lets just imagine you mounted some 8 foot tall floor-to-ceiling 1D diffusers to scatter sound in the horizontal plane (left and right).
You're sitting down and these tall 1D diffusers tower over you. Above a certain height they are diffusing reflections above your stereo listening plane. Whether or not this has any effect on your sound stage depends on how the diffused reflections interact with other surfaces in the room.
If the diffused reflections are absorbed before they reach you they are not providing an acoustical benefit to you, the listener. But if they have a path to bounce around the room, eventually reaching your ears, they arrive as many tiny reflections highly dispersed in space and time. You perceive this as a pleasant ambience. Even when not optimally placed, more diffusion generally leads to a more diffusive sound field in your room, causing a reverberation that sounds warmer and richer.
Bass "trapping" and broadband absorption is the first acoustic treatment priority.
In your critical listening or control room, the main acoustic treatment strategy is usually to create a reflection free zone (RFZ) around the listener, using absorption to control early reflections. In general, for small rooms, focus on using bass "trapping" and broadband absorption to treat your problems.
To help you get started, check out the ultimate guide to bass trap placement. Then, after you've applied broadband / bass absorption, you can add diffusion if you want to bring a bit of life back into the room.
Especially if you're on a tight budget, don't let nice-to-have diffusion take precedence over critical absorption. Also, if you're going DIY, acoustic treatments like bass traps and broadband absorbers are easier to build than diffusers.
FYI: In certain spaces, such as Non-Environment (NE) control rooms, sound diffusers offer little to no benefit and may interfere with the intended room acoustics.
What diffuser design is easiest to build, but still has good performance?
If you want good performance with relatively simple construction, I recommend you build Leanfuser™ (Al-LF) panels and mount them in one of the recommended profiled modulations.
What's the best fractal diffuser design?
Fractal diffusers take more time to build, but they can be well worth the effort. If you're looking to buy a 1-dimensional fractal diffuser, the best choice is the Diffractal® by RPG, which is a nested broadband QRD diffuser. But if you're looking to build a fractal diffuser, here's where it gets fun...
Instead of building the B2-Fractal (the Stepfractal™), consider the A1-Fractal (the Leanfractal™). It's my new personal favorite because you can mount it using the same profiled modulations that are suggested for A1-LF. Mounted this way it can potentially perform better than the default Stepfractal™ configuration. The Leanfractal™ is also simpler to construct.
I've not made blueprints for the Leanfractal™, but the specs for the A1-Frac panels can be found in Chapter 8 of my thesis (available on the download page). For ideas on how to build this fractal diffuser, check out these links:
- Example Leanfractal™ construction photos (Thanks Pablo!).
- How to mill the fractal cells on a milling machine (Thanks Schaap!).
In the thesis I used a fractal step increment of 2.85mm for the fractal cells (see Tables 5 and 6 on page 51 of the thesis). Anything smaller than this would have taken too long to simulate, and would have left a performance gap in the diffusion spectrum. The resulting depth sequence for the small fractal cells is [0, 11.4, 14.25, 8.55, 14.25, 11.4 0] mm. To make milling easier you can round the sequence to [0, 11, 14, 9, 14, 11 0] mm.
If you prefer a spikier look you can increase the depth of the fractal cells. For example, if the depth of the fractal cells are doubled they would be about [0, 22, 28, 17, 28, 22, 0] mm deep. Or you can simply use [0, 20, 25, 15, 25, 20, 0] mm, which are the fractal dimensions that Schaap demonstrates here. Increasing the fractal cell depth is likely to increase the high frequency performance, but if you take this to the extreme these deeper fractal cells may be fragile.
If you have a chance to simulate your fractal diffuser using Reflex, feel free to send me the results so I can share them with the community.
Now, if you’re ambitious, here is the ultimate build (which I’d love to see photos of): Build 7 A1-Frac panels and mount them using the fractal modulation labelled "Profiled Modulation 2". The resulting design would have high frequency diffusers (the little fractal cells), nested inside Leanfuser™ panels, which are nested inside a big profiled array (7 panels mounted with Profiled Modulation 2). Effectively, a third-order fractal diffuser.
The width:depth ratio of the 1st, 2nd and 3rd order stages do not have equal proportions. This is for practical reasons (in the low frequency stage) and performance reasons (in the high frequency stage). If you want to take the fractal self symmetry concept literately (and achieve better low frequency diffusion) you can modify Profiled Modulation 2 so it has the same width:depth ratio as the Leanfuser™. The resulting diffuser will be over 40 cm deep. I've referred to this as the "Deep Fractal Modulation" in the A1-LF fabrication drawings document.
We've been discussing some of the details of 3rd order fractal diffusers in this thread.
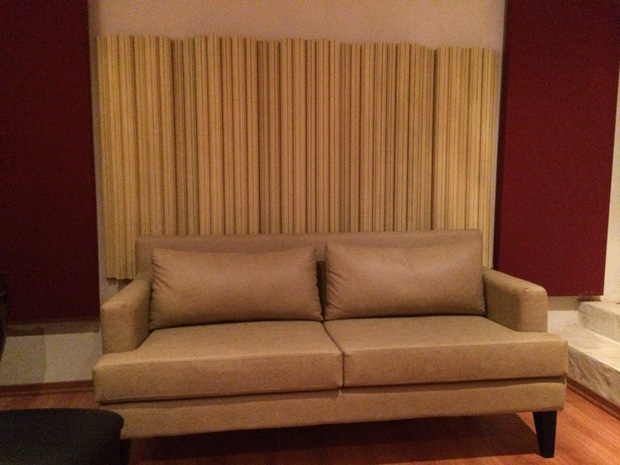
Fractal sound diffusers DIY build: 5 Leanfractal (A1-Frac) diffuser panels assembled using Profiled Modulation 1. Note that couch is not used for critical listening (the diffusers are not designed for such close proximity). Built by Pablo Crespo.
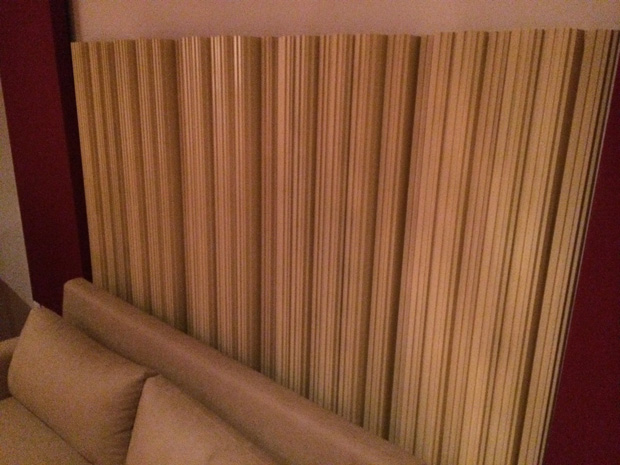
Fractal acoustic diffusers DIY construction: 5 Leanfractal (A1-Frac) diffuser panels assembled using Profiled Modulation 1. Note that couch is not used for critical listening (the diffusers are not designed for such close proximity). Built by Pablo Crespo.
Stepped diffusers vs. quadratic residue diffusers (QRD diffusers)
Why don’t these sound diffusers have fins like QRD diffusers? How is a stepped diffuser different from a QRD diffuser?
Coming soon!
Diffusion coefficient measurement: how to easily test your diffuser's performance using AFMG Reflex
Why risk building a diffuser that may not perform when you can test it before building it?
The quickest way to assess acoustic diffuser performance is to visualize the autocorrelation diffusion coefficient.
Using the 30 day trial of the software AFMG Reflex, you can compute the autocorrelation diffuser coefficient (and the scattering coefficient) for many custom diffuser geometries.
Reflex uses a physical modeling technique called the boundary element method (BEM) to predict the diffusion performance of a wide variety of geometries. If the diffuser you envision is made from basic shapes like rectangles and circles, chances are you can simulate it.
The most important measurement to visualize is the normalized diffusion coefficient for random incidence (or “diffuse field”). To compute this in AFMG Reflex, go to the report generation setting, create a Coefficients Plot report, and select the following options:
- Set the frequency range from 100 Hz to 4000 or 8000 Hz. If you’re simulating fractal diffusers or diffusers with narrow wells, set the upper limit to 8000 Hz or higher.
- Set the resolution to 1/3 octave for comparison to other measurements. You can also test with higher resolutions, but the results become more complex to interpret.
- Set the direction of incidence to “Diffuse Field”.
- Check the boxes for “Scattering Coefficient”, “Normalized Diffusion Coefficient”, and optionally you can also select “Diffusion Coefficient”.
- Set the frequency averaging to “None”.
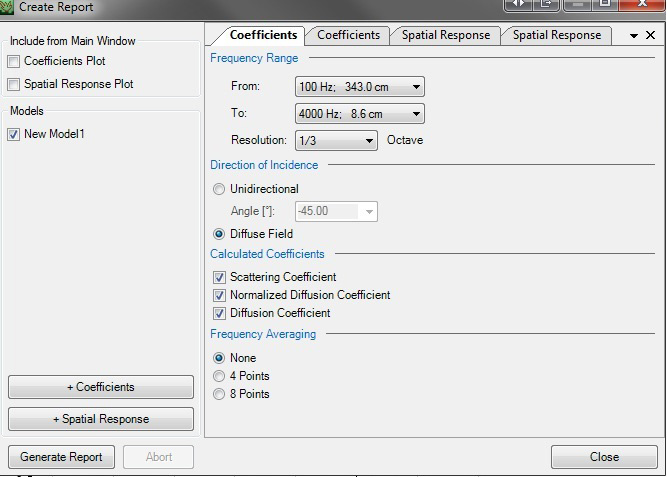
Basic settings to measure the normalized autocorrelation diffusion coefficient in AFMG Reflex.
For fractal diffusers or diffusers with narrow wells, set the upper limit to 8000 Hz or higher.
It’s easy to visualize basic performance trends when we plot the normalized diffusion coefficient as a function of frequency (shown as a red line), averaged in one-third octave bands. The higher the coefficient at a particular frequency, the better the diffusion at that frequency. Here is an example performance comparison between two similar diffuser geometries.
As you increase the frequency resolution the plots reveal additional details, but these can be difficult to interpret. If you want to be sure you obtain a meaningful result, here are some additional things to consider when interpreting the diffusion coefficients.
by Tim Perry

