Bass Traps 101: Placement Guide
Where to Mount Corner Bass Traps in Your Studio or Listening Room
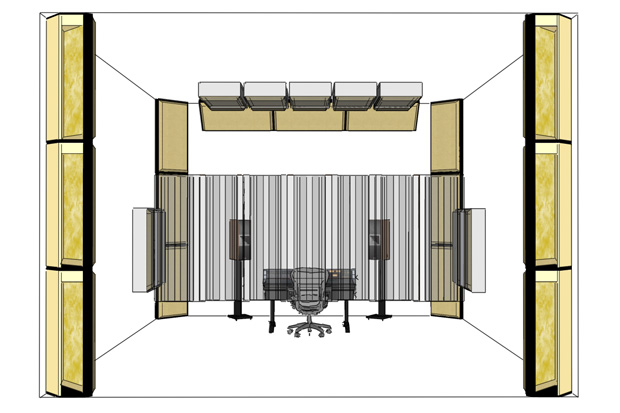
Bass trapping season is upon us. But where in your room should you place your bass absorbers, aka “bass traps”?
The short answer: treat the corners of your room to get the most bang for your buck. But that raises more questions, like… How many corners? Which corners?
To answer these questions, I’m going to show you examples of what a “bass trapping” (low frequency sound absorption) scheme might look like. Use this tutorial to tame the low end beast in your recording studio control room, critical listening room, home theater or man cave.
First, let’s be honest. You’re not actually going to be trapping any bass. Low frequency sound waves are way too long to fit into any conveniently sized bass “trap”. You’re actually going to be absorbing bass energy… in other words, killing it by converting it to heat.
Why do I need low frequency control?
Here’s the low down on the down low…
Small and midsize rooms — this includes all listening and mixing rooms — naturally have a brutally uneven bass response. You may be unaware or claim not to care, but it’s a battle your ears have been fighting for years. They want nothing but to help you hear accurately.
To combat the brutal acoustics in small rooms, bass absorption is your heavy artillery.
Even the most expensive speakers and room correction software does not negate the need for bass treatment. Before you get distracted by high-end audio gear and sexy diffusers, grab a cup of coffee, because we’re going deep. I’m going to show you in detail how to tighten up your low end (if you’re lazy, scroll down to the example rooms).
Without bass control your musical foundation (everything you hear below 300 Hz) is heavily distorted by acoustical chaos: room modes, standing waves, random wave interference, comb filtering and speaker-boundary interference response (SBIR). Let’s take a quick look at room modes and then jump straight into the practical solutions.
Room modes — the bane of small room acoustics
Room modes are natural resonances caused by your room’s geometry. Your room applies a coloration to your sound, emphasizing certain tones, masking others, and adding a sloppy, uneven low end boost to your media.
Certain frequencies decay more slowly than others causing anomalies like “one note bass”, where every bass note sounds basically the same regardless of its true pitch.
Room modes blur other frequencies close to them, reducing overall clarity. They can also mask emotional content in your audio such as details in the human voice or the subtle vibrato of a singing guitar.
Unfortunately, you can’t just throw factory acoustic foam panels on your walls and call it a day. Bass waves require special consideration to treat because they radiate in all directions and are much longer and stronger than higher frequency sound waves.
To tackle your low end problems you need a low frequency treatment plan of attack. Properly placed bass absorbers will give your room a flatter frequency response and more even low frequency decay times.
You will immediately hear the details, balance and timbre of your media with greater accuracy.
This is the first step to give your listening experience more transparency and definition.
So where do I mount the bass traps?
Bass builds up more strongly in the corners of your room, and most strongly in trihedral corners (wall-wall-ceiling and wall-wall-floor intersections). Technically speaking, the variation of sound pressure for all frequencies is maximum in the trihedral corners.
Here’s a psychedelic simulation that shows sound pressure buildup for one particular room mode:
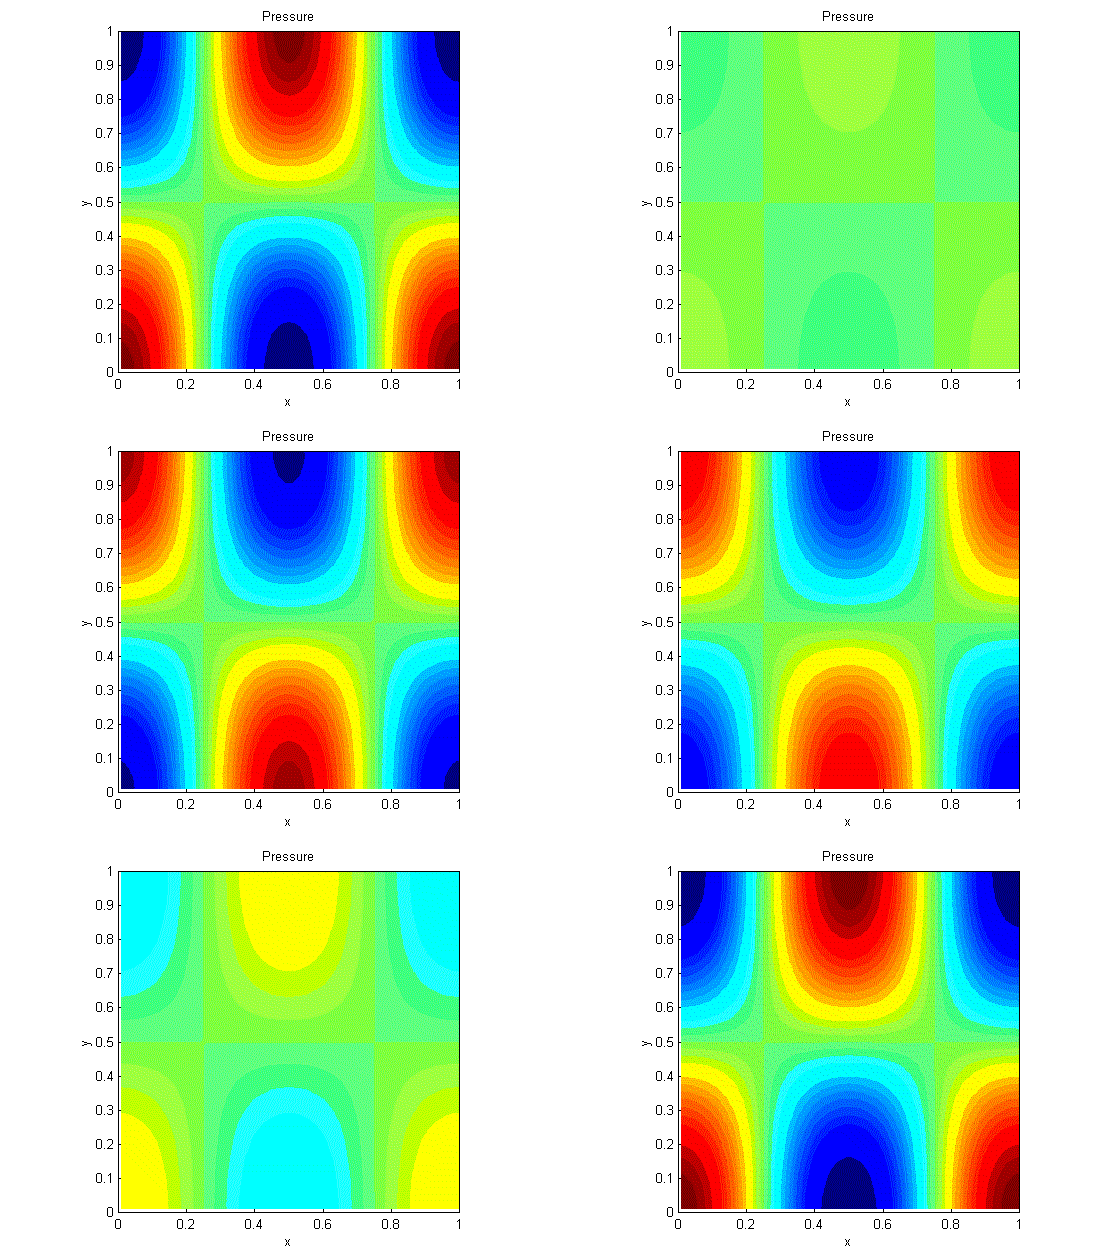
Acoustic modes in a rectangular room (courtesy of Purdue University).
Naturally, the corners are the first places to consider when placing bass absorbers. But before blindly stuffing foam or sound absorbing insulation into the corners of your room, you also need to consider the distance from the wall.
At the point where a sound wave touches your wall its pressure is maximum, but its velocity is zero…
Here’s a simplified analogy: Imagine running head first into a wall.
Before you hit the wall you have high velocity (and questionable intelligence). The moment you impact the wall your velocity is zero, but the pressure sure is high! Don’t believe me? Ask this guy:
Bass absorbers may act on the pressure component of the sound wave, the velocity component, or both (if they use a combination of low frequency absorption technologies).
Resonant absorbers (also called pressure absorbers) act on the pressure component, so they have maximum sound absorption where the pressure is maximum: right against a room boundary, like your wall or ceiling.
Frictional or porous absorbers (also called velocity absorbers) act on the velocity component of a sound wave. These are your mineral wool, fiberglass and studio foam type materials. They use friction to slow down the air particles that “ride” sound waves, converting kinetic energy into heat. Naturally, they absorb most efficiently where your sound wave-surfing particles have maximum velocity.
In a sound wave the velocity is maximum (and the pressure is zero) at ¼ the wavelength from a boundary.
So, we know the velocity is zero at the wall, and maximum at ¼ the wavelength away. We also know that low frequencies have long wavelengths. What does this mean for the poor man’s rigid fiberglass acoustic panel? (answer below)
Porous absorbers (most generic sound absorbing panels) don’t work on low frequencies unless they are very thick, or placed far enough away from the wall.
The quarter wavelength rule for porous absorbers
Be warned! Porous or fibrous absorbers, like 3” thick panels of Owens Corning 703, Roxul Safe’n’Sound or acoustic batt insulation, do not provide low frequency absorption when you mount them flat on your wall. You can, however, lower the minimum frequency absorbed by mounting them with an air gap between the absorptive panel and wall.
For porous absorbers, the bigger the air gap, the lower the minimum frequency absorbed. Use the quarter wavelength rule to determine the best gap size for a given frequency:
Optimal Gap (feet) = ¼ Wavelength = ¼ (1125 / Frequency)
OR
Optimal Gap (meters) = ¼ Wavelength = ¼ (343 / Frequency)
Example 1: for a 200 Hz sound wave, the wavelength is 1125/200 = 5.6 feet. A quarter of that is 1.4 feet (0.43 meters).
Example 2: for a 60 Hz sound wave, the wavelength is 1125/60 = 18.8 feet. A quarter of that is 4.7 feet (1.43 meters).
Dang! You need a lot of space to absorb low frequencies using porous absorption!
The lesson learned: If you’re using porous absorption on its own as a DIY “bass trap”, mind the gap, or make it fat.
Mind the gap: One approach uses a thick slab of fibrous batt material (like Knauf ECOSE® acoustical board
, Roxul Rockboard 60
/40 rockwool, OC 703
/705
rigid fiberglass, Bonded Logic UltraTouch or acoustic foam) straddling the room corner. This creates an air gap. The sound velocity is minimum when touching the corner, but increases dramatically in the space in front of the corner. We’re exploiting this. The result is a simple corner bass absorber, sometimes called an “edge absorber”
.


FYI: Bonded Logic UltraTouch (made from recycled denim), while great for many other applications, is NOT recommended for superchunk absorbers. In thicknesses over about 4″, the effectiveness of UltraTouch as a porous absorber is reduced due to high gas-flow resistivity.
Get better traps: A more effective and space efficient approach is to use purpose-built LF devices, like limp membrane bass traps and diaphragmatic absorbers. These act on the pressure component of the sound wave, not just the velocity component.
Corner bass trap placement – your bass absorption foundation
Now, let’s plan out the general locations for placing bass traps.
Let’s assume you have a rectangular room. It has 12 dihedral corners (where two surfaces meet) and 8 trihedral corners (where three surfaces meet).
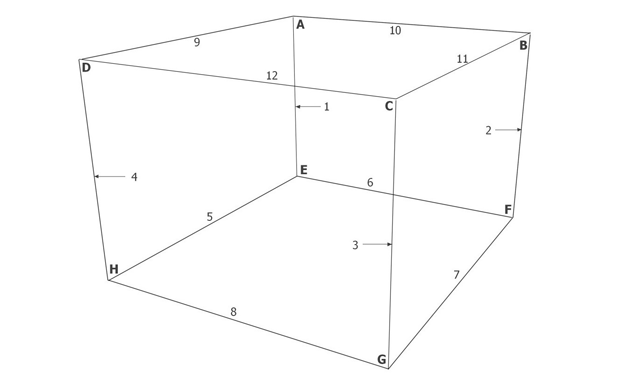
Best locations for mounting bass traps in a rectangle room (12 dihedral corners, 8 tri-corners).
Start by looking at the wall-to-wall corners, labeled 1, 2, 3 and 4 in the above drawing. You can make a big impact to your room by adding floor-to-ceiling bass traps to those four corners. We’ll call these the power corners.
By spanning the power corners you cover 4 dihedral corners, but more importantly you cover all 8 critical trihedral corners (A, B, C, D, E, F and G).
All your room modes are congregating in these tri-corners, so this is a good way to ruin their party — provided your bass traps can absorb at the frequencies needed (the most important bass frequency range for music is from about 60 to 300 Hz).
If you can only have two corner bass traps, the best place for them is usually along corners 1 and 2.
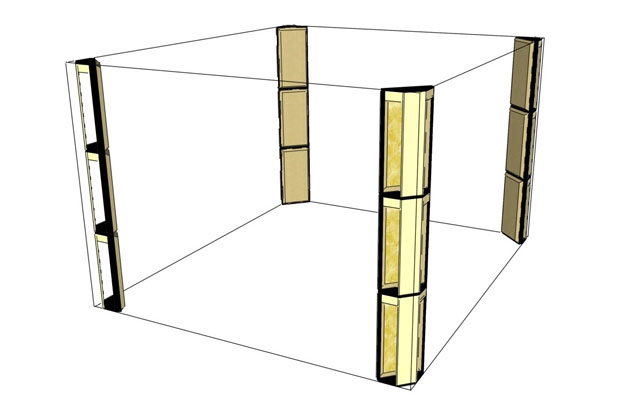
Floor-to-ceiling corner bass traps placed in the four power corners of a rectangular room.
Example: Corner Bass Trap Placement Foundation 1
- Floor-to-ceiling bass traps along corners 1, 2, 3 and 4.
- Any number of corner bass traps straddling the wall-ceiling or wall-floor intersection. For example, you could place bass traps at dihedral corner 10 (shown below), or 12, or both.
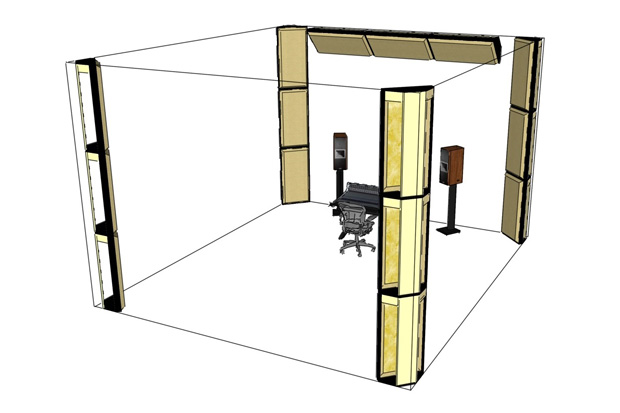
Corner bass trap placement foundation 1 with floor-to-ceiling bass absorbers in wall-to-wall corners.
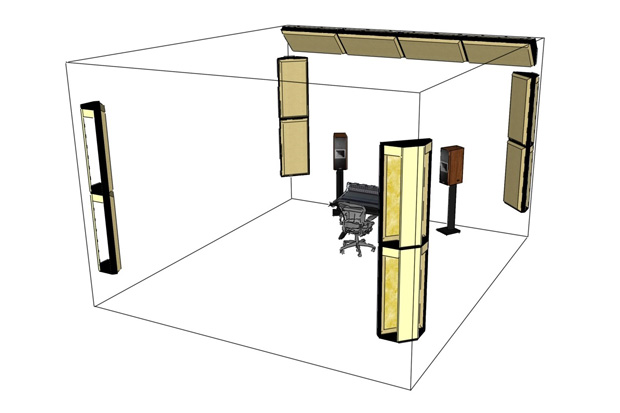
Corner bass trap placement foundation 1A with focus on dihedral wall-to-wall corners.
Use when corner obstructions, cost or aesthetics prevents floor-to-ceiling corner-mount bass traps.
But what if you don’t have all four power corners available? Maybe there’s a door in the way, or maybe your spouse has claimed that corner of your studio and is enforcing a totalitarian policy of feng shui.
Don’t worry. Look at all the other corners in your room. What about the wall-ceiling and wall-floor intersections?
Example: Corner Bass Trap Placement Foundation 2
Let’s say doors are in the way of tri-corners G and H. Here’s a possible bass trap arrangement that exploits your wall-ceiling corners:
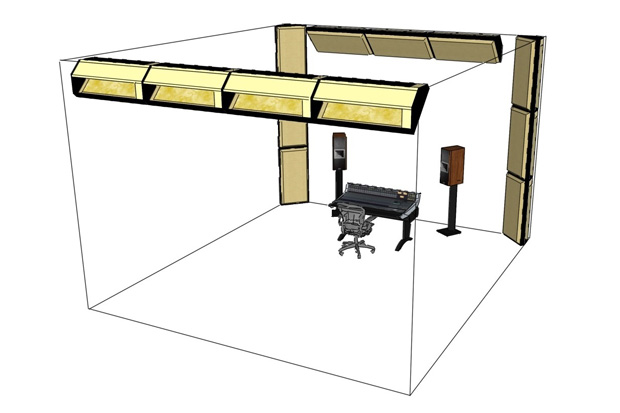
Corner bass absorption foundation 2.
Broadband bass traps in front wall-to-wall corners and front and back wall-to-ceiling corners.
Example: Corner Bass Trap Placement Foundation 3
One approach is to mount a perimeter of bass absorbers around the edges of the ceiling, along dihedral corners 9, 10, 11 and 12. This soffit-style array of bass traps covers 4 dihedral and 4 trihedral corners.
While not as efficient (less bang for your buck) as spanning all four power corners, soffit bass traps are great if you’re trying to maximize floor space by leveraging ceiling acoustic treatment.
Also, most rooms are wider and longer than they are tall. This means your wall-ceiling corners can hold more bass traps than your power corners.
Span all your ceiling corners with bass traps, and you will make monster progress in the quest to tame your low end beast and smooth out your bass response.
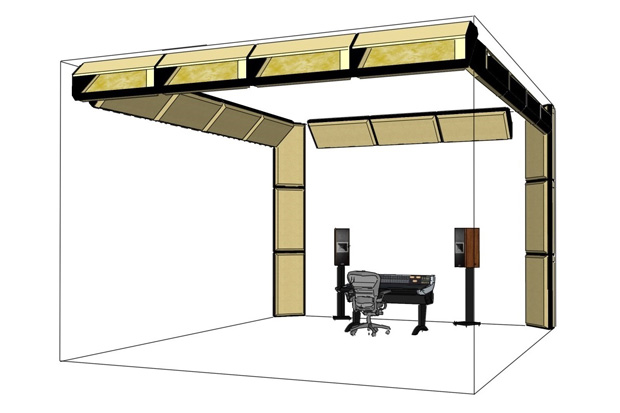
Corner bass absorption foundation 3.
Soffit style bass trap around the edge of the ceiling with floor-to-ceiling bass traps in the corners.
Finding bass buildup hot spots
Bass energy buildup can vary from corner to corner due to factors like your speaker and subwoofer placement, as well as the geometry of your room. You may not be able to treat all your corners, so a great way to prioritize bass trap placement is to determine which corners have the most bass buildup.
-
The best way to find hot spots is to use a test microphone and room measurement software like Room EQ Wizard (Free). But don’t fret. If you’d rather not fiddle around with acoustic testing, here’s a quick and dirty alternative that you can try right now:
- Download this filtered pink noise mp3 file. Pink noise has energy at all frequencies so it can excite all the modes in your room. High frequencies have been filtered out of this pink noise to make it easy for you to hear the low end.
- Start playing the noise in your room.
- Walk around the room, sticking your head into all the corners and listening to find where bass energy is accumulating most.
- Place bass traps in the corners that have the most bass buildup.
-
If you have one, an SPL meter (sometimes called a “decibel meter”) is a better diagnostic tool than your head. Here are a couple economical options:
- iTunes Sound Level Meter
- Galaxy Audio CM130 Sound Level Meter

Beyond the corners: wall and ceiling bass trap placement
Corner treatment is the foundation of your bass absorption plan of attack, but there are other places where bass traps are useful. Remember, bass waves are reflecting off all surfaces of your room… they are not just accumulating in the corners.
Peaks and nulls caused by non-modal problems (like SBIR) are best treated by adding low frequency absorption to the wall and ceiling reflection points that are causing the problems. As you treat these reflection points you can simultaneously treat other acoustical problems in your room.
I’ll touch on this below (and if you’re subscribed to email updates, I’ll give you more specific techniques for treating your room in the future).
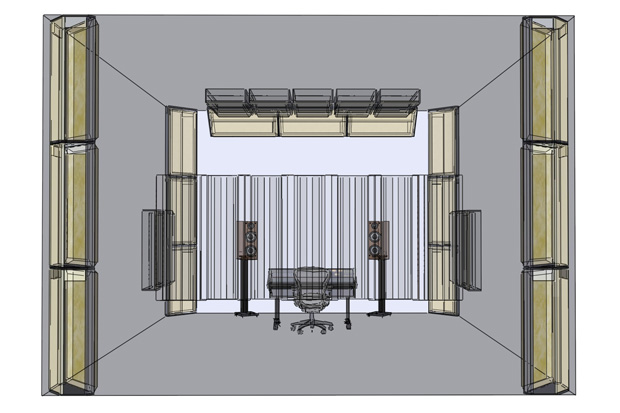
Mixing / listening room showing basic acoustic treatment placement (bass trapping, diffusion, reflection free zone absorption). Focus on corner bass absorbers. Example bass traps shown are the Primacoustic MaxTrap and FullTrap.
Bass traps, broadband absorption and decay (reverberation) time
In most domestic sized rooms, arranging broadband bass traps in the corners will noticeably reduce the overall liveliness or ambience in the space. This is because most broadband bass traps are surfaced with a porous material (like acoustic foam, rockwool or fiberglass). These devices absorb over a wide bandwidth — not just low frequencies — so we can classify them as broadband or wideband absorbers.
Broadband absorbers reduce the decay times at all frequencies in the audible spectrum: low, medium and high.
If you want to preserve liveliness, there are bass traps that absorb low frequencies but reflect / scatter mid and high frequencies. They let you add enough bass absorption to tightly control your low end without killing all the mid and high frequency energy (which would render your room lifeless and sterile).
These devices are surfaced with a reflective material (such as a wood scatter plate or plastic membrane), instead of a porous, sound absorbing material.
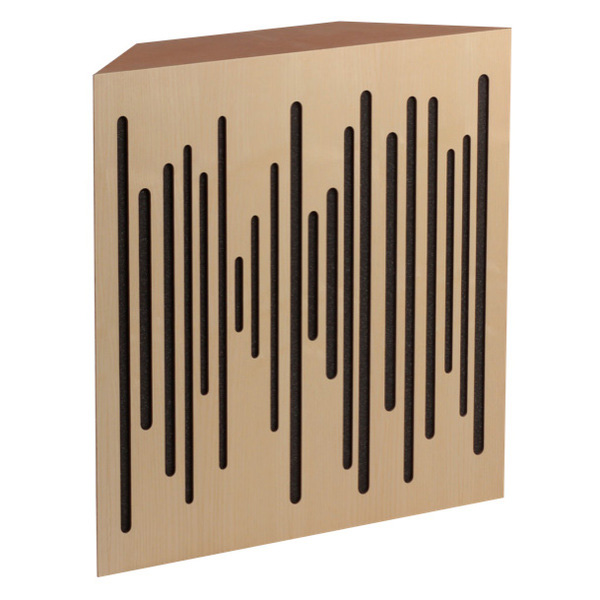
Vicoustic’s Super Bass Extreme trap is surfaced with a slotted wood panel that scatters / diffuses higher frequencies.
On the other hand, if you want to further reduce decay times in your room, additional broadband absorber panels can be arranged on your walls. Your first reflection points are a good place to start as they typically need treatment anyway (broadband absorption, diffusion, or hybrid acoustic panels that provide a combination of the two).
How much liveliness does my room need?
In small room acoustics we use decay time (T30) to measure liveliness. T30 is a proxy for reverberation time (RT60), because small rooms don’t have true reverberation. Typical decay times in control rooms and critical listening rooms are 0.2 to 0.5 seconds. But, if you’re in a particularly small room (say, a bedroom), aim for 0.1 to 0.3 seconds. The smaller the room, the shorter the decay times should be.
Room EQ Wizard (free software) can be used to measure the decay times, but you can get a feel of the liveliness in your room simply by clapping.
In general, mounting broadband absorbers on your walls and ceiling reduces liveliness, flutter echo and ringing in your room. Broadband absorption also helps to flatten the frequency response of your room, giving you a more neutral, controlled listening environment.
Example: Corner bass traps + broadband absorbers mounted at first reflection points
Suppose you have a 15’x17’x8’ room, in which you mounted 10 broadband corner bass traps (each four feet tall): two on each of the four power corners (dihedral corners 1-4), and two on dihedral corner 10.
You want to reduce the liveliness a bit further while treating early reflections and flutter echo, so you place additional broadband absorbers at your first reflection points on your sidewalls and ceiling, and on the wall behind you (you could alternatively use diffusion here). Example products suitable for this are the Primacoustic FullTrap and RPG Modex Broadband.
Putting it all together: Integrating LF absorption into your room
The images below show example room treatment layouts that incorporate low frequency absorption. To avoid clutter, the following examples show minimal broadband absorption on the walls and ceiling.
In practice, additional broadband absorbing panels (and perhaps diffusion) would be applied as needed to achieve the desired level of liveliness. Critical listening rooms often pair a reflective (e.g., wood) floor with a highly absorptive ceiling. To prevent slap echo and flutter echo we usually want to avoid any large areas of bare wall or ceiling.
-
Shown below are some acoustic treatments that were omitted from earlier examples:
- Reflection free zone (RFZ) treatment. In the examples below, this consists of broadband absorbers at the sidewall and ceiling first reflection points.
Many people simply use mid-high frequency absorption at reflection points, but broadband bass traps placed here can help reduce non-model peaks and nulls. They will also have some impact on room modes (primarily the axial modes, which are resonances that occur between two parallel surfaces like parallel sidewalls, or the floor and ceiling). A hanging ceiling cloud is typically used on the ceiling, but I’ve used broadband bass traps in the following examples. - Diffusion on the back wall to prevent slapback and flutter echo, to increase clarity (by dispersing early reflections from the back wall), and to provide an increased sense of spaciousness. Diffusion should only be used here if there is sufficient space between the back wall and listening position. Otherwise, absorption is most suitable behind the listener.
The minimum listening distance for diffusion depends on the diffusers used, but in general at least 10 feet is desired to achieve a well defined initial time delay gap (ITDG) in critical listening or control rooms. In studio acoustics the ITDG is often called the initial signal delay gap (ISD gap). In digital reverb processors the ITDG is modeled using the “pre-delay time” parameter.
The example room is treated as a reflection free zone (RFZ) style critical listening / control room, but with minimal ceiling and wall treatment. If you were to apply heavy broadband absorption to the front of this room it would become a live-end, dead-end (LEDE) room.
Room Ratios: The example room dimensions (12′ high x 16′-10″ wide x 19′-11″ long) are based on the height:width:length ratios 1:1.4:1.66. These particular ‘room ratios’ were chosen because they produce a room with relatively evenly spaced low frequency modes. This gives the room a flatter bass response than similar sized rooms with less optimal ratios. Acoustically, cubic rooms have the worst ratios (1:1:1). You may not be able to choose the size of your room… but if you can, avoid cubic rooms like the plague.
If you’re building your room from scratch, here are the best known dimensions for small listening rooms.
Example Room Setup 1
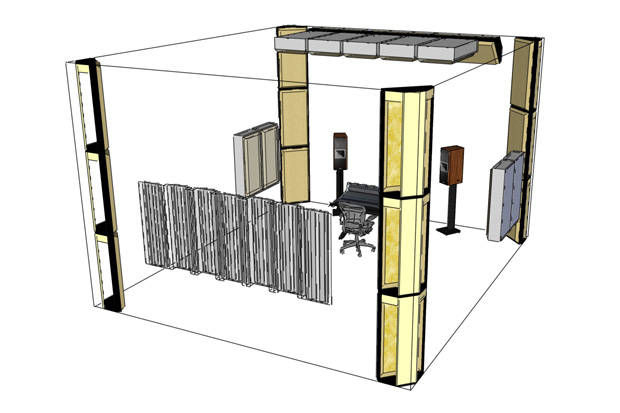
Bass traps and other acoustic treatments arranged in a critical listening / mixing room. Corner bass absorption helps control room modes and other LF problems like standing waves and acoustic interference. Broadband bass traps are used as acoustic panels to absorb early reflections, creating a reflection free zone (RFZ) around the listener. Optimized acoustic diffusers scatter back wall reflections, making the room sound more spacious and airy, with a hint of liveliness.

Placement of bass traps and other acoustic panels in a control / critical listening room. Floor-to-ceiling corner bass absorbers are an efficient strategy to control room modes and reduce other low frequency problems like comb filtering caused by speaker placement relative to walls. Rear wall diffuser reduces flutter echo and slapback, while enhancing the sense of spaciousness. Broadband absorber panels at the ceiling and sidewall first reflection points create a reflection free zone around the listener (a hanging ceiling cloud may be used instead of the ceiling bass traps shown).
Example Room Setup 2
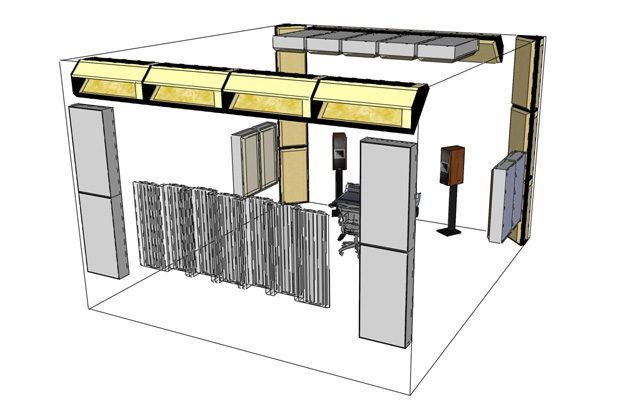
Example room layout when obstructions prevent rear corner bass trap mounting. Primacoustic MaxTrap used for corners, Primacoustic FullTrap used as wall mounted bass absorbers on the back wall, and to create a reflection free zone around the listening / mix position.
Example Room Setup 3
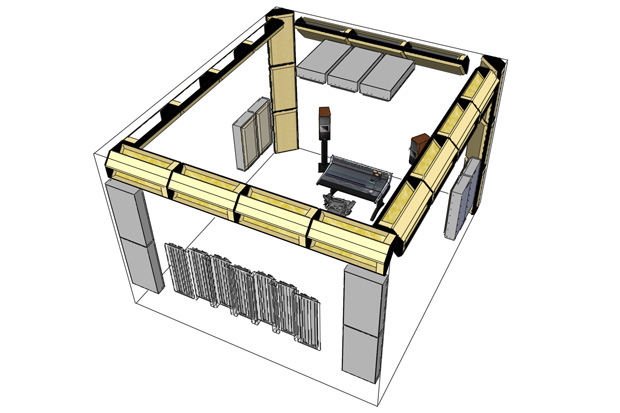
Example room setup 3. “Soffit” mounted bass traps provide an out of the way alternative when the wall-to-wall corners can’t be treated. Primacoustic FullTrap used on back wall and to absorb first reflections around the listening position.
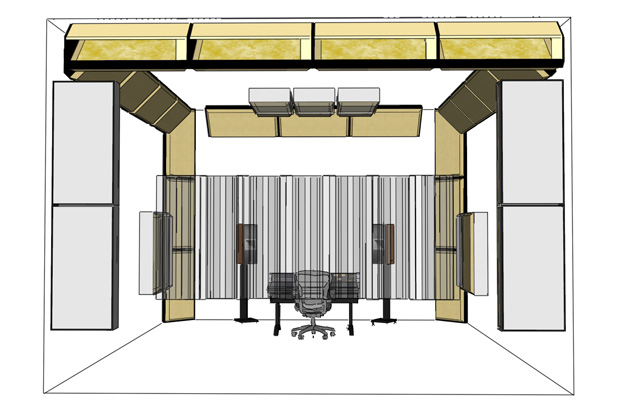
Example room setup 3, rear view, featuring a circumference of corner bass traps around the ceiling in the style of a “soffit”. Primacoustic FullTraps arranged on back wall, sidewalls and ceiling (a hanging ceiling cloud can be used instead). MaxTrap corner bass traps used elsewhere.
Optimizing your low end with tuned bass traps
Lets say you’ve applied broadband bass absorbers to your room but you still have problems at specific low frequencies. It’s time to bring in the tuned bass traps.
Broadband bass traps absorb over a wide range of frequencies, but with limited efficiency. In contrast, tuned bass traps absorb extremely efficiently over a narrow range of frequencies. They are narrowband absorbers.
I consider a tuned bass trap to be any resonant absorber that’s tuned to a desired center frequency (e.g., 75 Hz), with a narrow bandwidth. The tuned absorber absorbs sound energy most efficiently at its resonant frequency. Here it has a very high sound absorption coefficient.
In pro audio terms, it effects an acoustic signal kind of like how a notch filter (a bandstop filter with a high Q) effects an audio signal.
Resonant absorbers include tuned membrane bass traps (diaphragmatic absorbers / panel absorbers) and Helmholtz resonators. They are also called pressure absorbers because they act on the pressure component of a sound wave.
Naturally, they are useful at the boundaries of your room where the resonant room modes have maximum pressure (see guy runs into wall video).
The most common type of tuned trap is a tuned membrane trap, or panel absorber. Panel absorbers let you efficiently absorb low frequencies (under 100 Hz) in a surprisingly compact form factor. They may also be tunable.
The Helmholtz resonator is common in older recording studios, but tends to be trickier to design and build to spec. The Vari Bass by Vicoustic is an example of a tunable Helmholtz resonator. The advantage of a tunable device like this is that it can be tuned to accurately target a specific room mode, letting you optimize the performance for whatever room you’re in.
Tuned absorbers are often chosen to target particular room modes, so they are best specified on a room-to-room basis. They can be mounted directly in the corners of your room or positioned in hot spots to tame offensive peaks and nulls. For example, you could place them flat against the surface of the wall behind the listening position.
You can use acoustic measurement software like Room EQ Wizard to find hot spots for particular modal frequencies, but it can be tricky and time consuming. If you need help optimizing your low end consider a professional room acoustics analysis.
Heavy duty bass control in recording studio control rooms
Purpose-built recording studio control rooms have extensive low frequency absorption build right into the walls. These acoustic control walls are basically giant bass traps, designed to minimize low end decay times and equalize the room response, making it as neutral as possible for critical listening.
The most extreme examples are “Non-Environment” (NE) control rooms, also called “Hidley rooms”, which have thick broadband absorption systems build into the sidewalls, back wall and ceiling. The absorption systems in Hidley control rooms are often several feet thick!
Obviously this is not practical for the typical hi-fi listening room or home recording studio setup. Luckily, good bass absorption can be achieved in less space by using well designed bass traps, mounted in the right places.
The images below show an example of how you could take maximum advantage of the corners to achieve significant bass control, with commercially available (or DIY) bass traps, without taking up much floor space.
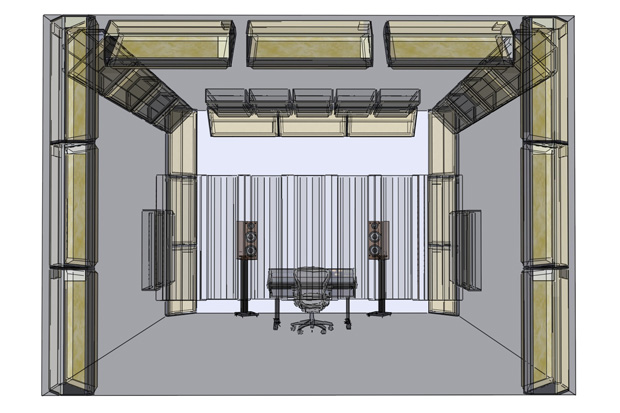
Mixing / critical listening room using extensive bass traps to control room modes and other low frequency problems. Also shown is back wall diffusion and basic RFZ treatment at the first reflection points (broadband absorption on the sidewalls and ceiling).
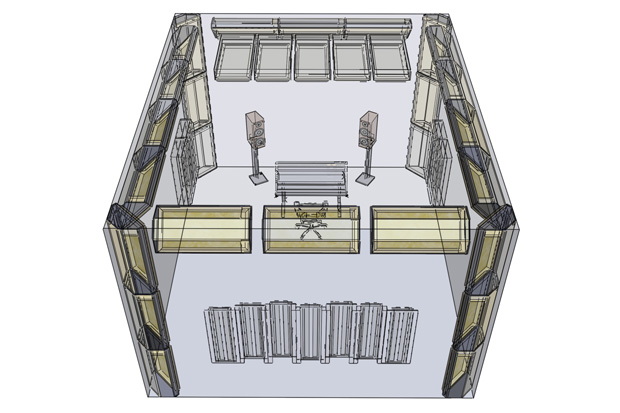
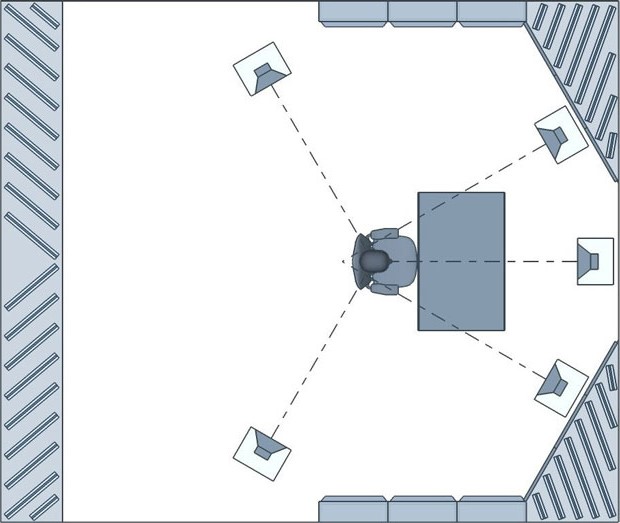
Surround sound mixing / control room with a broadband absorptive rear wall and large front corner bass absorbers. The front corner bass absorbers are surfaced with reflective material (e.g. wood slats) so they reflect / scatter at mid-high frequencies.
Your turn… tame your low end beast
Never forget: Bass absorption is the foundation for a tight, balanced sound in every domestic sized media room… be it a mixing room, mastering room, hi-fi listening room, home cinema or man cave.
Place bass traps in the corners of your room to damp low frequency resonant room modes and reduce nulls caused by bass waves bouncing off the wall behind you. Start by treating the four power corners if you can. Then, consider other places for bass trap placement, like the wall-ceiling / wall-floor intersections, and your first reflection points.
Start with broadband bass traps to gain control of the full bass frequency range. Then, if you want further control consider adding tuned membrane bass traps, or panel absorbers, to target the most problematic room modes.
The more bass absorbers you apply, the flatter and tighter your low end response.
For critical listening and mixing rooms it’s usually not possible to add too much bass absorption, but it’s quite easy to suck all the liveliness out of your room by adding to much absorption at mid-high frequencies. Luckily there are bass traps available that absorb low frequencies while reflecting / scattering mids and highs.
You can easily build your own low-cost, DIY broadband bass traps using 4″ thick Roxul Rockboard 60 straddling the corners of your room (use any of the example room layouts shown above). If you’d rather not do the work, you can find simple corner-mount broadband absorbers like this on Amazon
, eBay, etc.


What should I expect to hear?
With proper bass management your room will have a more even sounding response across the audible spectrum. Overall your soundstage will sound more unified and naturally balanced with tighter definition between tones.
You will hear the frequency balance and transients in your music with greater clarity. You will hear details that were previously masked by your boomy low end.
You will be able to make better mixes, trust your ears when mastering or critical listening, hear nuances you never new existed and better connect with your music.
A tight low end will dramatically enhance your listening experience. You might even shed tears of ecstasy (if you have an unhealthy passion for high fidelity audio) when you discover what you’ve been missing.
| < Room & Speaker Layout | Acoustic Treatment Layout > |
Do you know someone who might find this guide useful? If so, please share it :-)
by Tim Perry

Pingback: Frequencies of sound. 6 easy lessons to remember()