How to Create a Killer Sweet Spot in Your Room
The Ultimate Reflection-Free Zone Setup Guide: Placing Acoustic
Panels to Treat Early Reflections and Sharpen Your Stereo Imaging
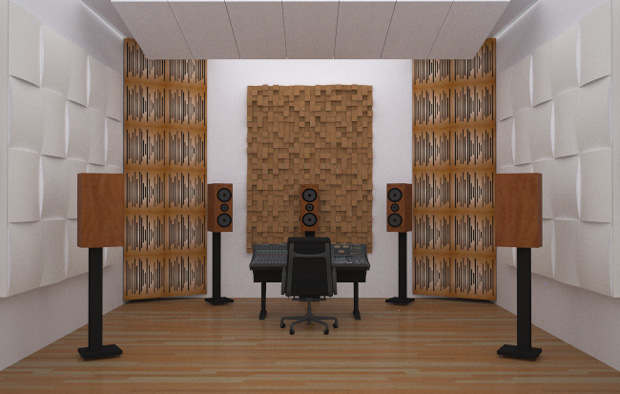
What’s the MOST POWERFUL thing you can do to dramatically improve clarity and imaging in your playback room? (Hint: it does not involve buying shiny new speakers.)
On your quest for sonic clarity, you’ll meet many early reflections. Some are nice.
Others are treacherous skallywags that throw you off course. They distort the sound reaching your ears. They destroy your soundstage, so you can’t hear details or localize sounds (like the stereo placement of two harmonized guitars).
Luckily, these trickster early reflections are easy to fend off with a few well-placed acoustic panels. I’ll show you how in this guide.
By the end of this tutorial you’ll know how to create a reflection-free zone around your listening position, so your speakers can realistically reproduce the nuances and soundscape of your favorite recordings… right in your room.
-
Here’s what you’ll learn:
- What are early reflections and why do I need to control these scallywags?
- What’s a Reflection-Free Zone and how can I create one in my room?
- The Mirror Trick — the easiest way to find your first reflection points.
- Pro Tip: How to exploit the Haas Effect to design your reflection-free zone.
- Pro Tip: Using the Initial Time Delay Gap to optimize your reflection-free zone.
- What type of acoustic panels should I use to treat my first reflection points?
- Treatment guidelines for studio control rooms, listening rooms, home theaters.
- But what about my front wall? Shouldn’t I add absorption there too?
What are early reflections?
-
When you listen to music in a room, you hear a rich blend of speaker sound and room sound. What you perceive as one sound is actually multiple mashed together:
- The direct sound coming from the sound source (your speakers, or a performer).
- Early reflections bouncing off nearby surfaces like the ceiling, floor, walls and reflective furniture like a desk or console.
- Late reflections, which in the worst case are maniacal echoes, but they eventually merge into what you hear as reverberation (pleasant ambience).
Early reflections are the first reflections you hear within about 80 milliseconds of hearing the direct sound from your speakers. And while I’m making them out to be evil, they’re actually super important.
They give you important cues about your location in a room relative to the walls, floor and ceiling. Early reflections also give you cues about how big the room is.
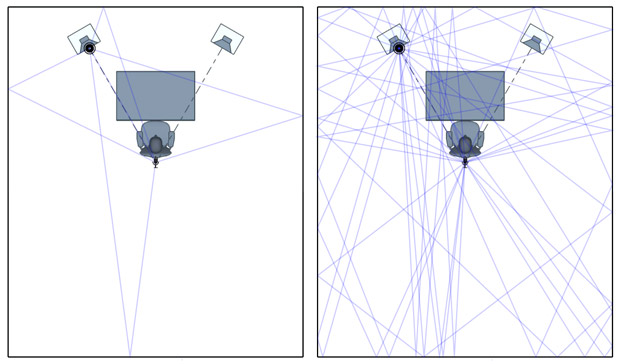 Ray tracing showing early reflections from the left speaker. Left: First-order reflections. Right: Third-order.
So why do I need to tame these friendly reflections?
They may be friendly, but that doesn’t mean they won’t trick you…
When you’re listening to media through speakers, certain early reflections become a problem because they interfere with what you’re trying to hear.
Would you rather hear your music… or your room?
Imagine… you’re listening to a recording of two acoustic guitarists playing on stage, in an auditorium, with gorgeous acoustics.
During playback through your speakers, you want to perceive the acoustics of the original space where the guitarists were recorded — so it feels like you’re there in person, soaking up the live vibes.
To make this work, the first reflections you hear should be the ones that were recorded — not the ones caused by your playback room!
But there’s a problem, because most recorded spaces (like tracking rooms and concert halls) are larger than most listening spaces (control rooms, mastering rooms, listening rooms, home theaters).
To hear those first reflections of the guitarists playing in the performance hall, we need to suppress the first reflections in your playback room.
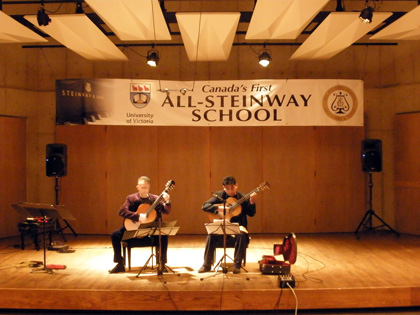
Early reflections can butcher your soundstage
You want the soundstage in your room to faithfully reproduce the soundscape encoded in your media. This means you want to hear spatial cues coming from your speakers — not from your room!
But early reflections from your room can overpower the spatial cues in your media. They throw off your imaging, destroy your soundstage and mask fine details like the sense of depth and width in a recording. This is called auditory masking.
Your soundstage: When you play back a recording in your room, the recreation of that recording in the x, y and z axis is called the soundstage. Soundstaging refers to how accurately your playback system reproduces the size, shape and acoustics of a recorded space and the performers in it.Early reflections in a recorded room (top) vs reproduction in an ideal playback room (bottom). With a realistic soundstage, the virtual source (phantom image) in the playback room has the same localization cues as the recorded source. Courtesy of Helmut Oellers at www.holophony.net.Phantom images: A realistic soundstage lets you close your eyes and perceive sound sources between your speakers, with good definition and separation. For example, if you have two speakers, you can localize sounds that seem to come from distinct locations between the speakers. These are called phantom images or phantom sources.
Early reflections cause comb filtering
Left untreated, early reflections will combine with the direct sound from your speakers, causing an acoustic distortion called comb filtering (or “time smearing”).
Comb filtering colors your sound (changes its spectral content), masks details and prevents accurate localization.
Early reflections start a chain reaction
Your hearing system combines the direct sound with early reflections and reverberation, so you perceive a single, blended sound. In many cases, the direct sound contributes much less to the frequency response at your listening position than the combined reflected sound.
Early reflected energy continues to bounce around your room as it decays, turning into late reflections and reverb.
Naturally, the character of those first reflections has a huge influence on your total sound.
This means you can shape your sound with just a few acoustic panels at your first reflection points! Why not exploit this?
One goal is to find the right blend of direct vs reflected energy. But first things first: let’s see how you can delay that reflected energy long enough so it doesn’t damage your soundstage.
Two ways to create a Reflection-Free Zone (RFZ) around the sweet spot
-
A reflection-free zone (RFZ) is simply a region surrounding your listening position where you don’t hear initial reflections. There are two ways to create an RFZ:
- Splay (angle) your walls and ceiling so early reflections are deflected away from your listening position. This type of geometry is common in professional studio control rooms.
- Add acoustic treatment to your first reflection points. This is the method I’m going to teach you.

I’ll explain the magic behind how this works, but first let’s get practical and see how to actually find your first reflection points.
How to find your first reflection points — The Mirror Trick
Recording studio designers and acoustical engineers use a technique called ray tracing to find early reflection points. This lets them plan a reflection-free zone around the listening position before building the room.
-
But if your room is already built, there is an easier way to find your first reflection points: the mirror trick. Call a friend over and you can start right now:
- Sit in your listening position.
- Get your friend to hold a mirror, at speaker height, flat against your left or right sidewall at the front of your room.
- Have them slowly walk along the wall, toward the back of the room, while you look in the mirror.
- Wherever you see a speaker in the mirror, mark that location on the wall. If you have two speakers, then you should have two locations marked on each sidewall (one where you saw the left speaker in the mirror, one where you saw the right).
- Repeat this for your other sidewall, and back wall (and ceiling, if you’re not using a cloud).
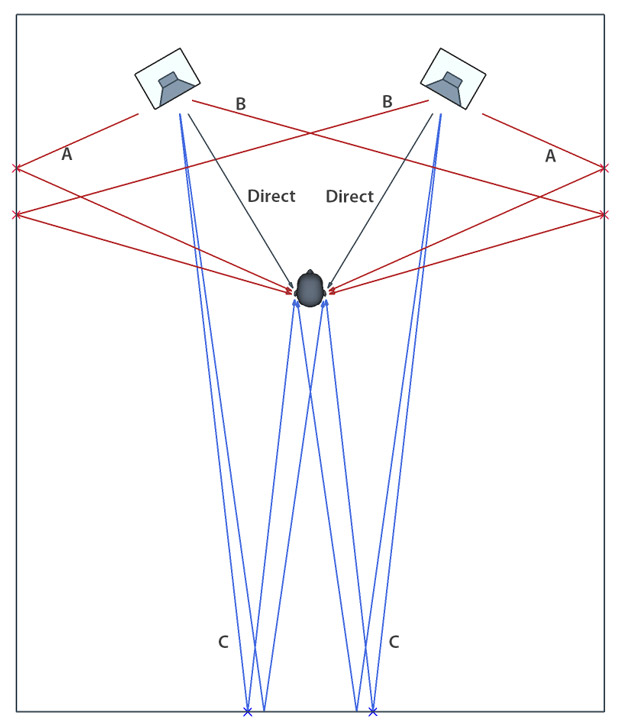 First reflection points on side and rear walls. The X’s show the outer limits of where you’d see a speaker tweeter in the mirror. Sound spreads out as it travels, so treatment should extend beyond these points.
These are your first reflection points — but you may not have to treat them all, as I’ll show you next.
To ensure a large reflection-free zone, treat a larger area than the mirror shows. This way, multiple people can listen in the RFZ, and your head won’t leave the zone if you move slightly out of the sweet spot.
For the discerning listener, the next sections will show you how to be more sophisticated / obsessive compulsive when creating your reflection-free zone.
If you’d rather jump straight into treating your reflection points, here are tips on choosing acoustic panels.
Pro Tip: Exploiting the Haas Effect to design your Reflection-Free Zone
To decide which reflection points need acoustic treatment, you can use a psychoacoustic principle called the Haas effect, aka the precedence effect.
You experience the Haas effect when you hear two identical sounds, from different sources, in rapid succession.
In your room, these two sound sources are typically the direct sound from your speakers, and a delayed copy caused by a sidewall first reflection.
But to explain the Haas effect, let’s first see what happens when the two sound sources are your left and right speakers, playing the same signal (human speech).
If the identical sounds arrive at your ears simultaneously (or within 1 ms of one another), you hear a phantom image halfway between the two speakers. And if one sound is delayed longer than about 30 milliseconds, you hear two distinct sounds. (Note that this 30 ms interval is only for speech signals.)
But something funny happens in between…
The Haas Effect: If the sound from your left speaker is delayed by about 15-25 milliseconds, the precedence effect is triggered — the two sound sources become perceptually fused so all the sound will appear to come from the right speaker. You will perceive just one image, panned hard right. In other words, your hearing system ignores the delayed copy when localizing the sound.
So how does this help us treat your first reflection points? Imagine now that the delayed sound is an early reflection off your wall.
The Haas effect tells us that if an early reflection arrives at your listening position, say, 20 ms after the direct sound, you don’t have to treat it because it’s not going to ruin your imaging. To mess up your imaging the reflection would need to be over 10 dB higher than the direct sound (meaning it would need over 10 times the energy!)
But what about early reflections before 15 ms? These reflections can cause image shifting and ruin your sound stage. Here’s where we need acoustic treatment to create your RFZ:
The European Broadcasting Union (EBU) and Telecommunications Union (ITU) recommend that you treat reflections earlier than 15 ms relative to the direct sound. Your goal is to tame these early reflection levels so they are at least 10 dB below the direct sound for all frequencies in the range 1 kHz to 8 kHz. (>15 dB below is better)
Sound travels about 17 feet in 15 ms (where the speed of sound is 1125 feet per second). This means before reaching your ears, you want the first reflections to travel at least 17 feet further than the direct sound. Otherwise, you’ve got to treat them so they’re at least 10 dB below the direct sound.
Actually, I recommend you aim for at least 15 dB for hi-fi rooms and 20 dB for control / mastering rooms (ideally, with diffused reflections delayed by at least 20 ms relative to the direct sound, as I’ll explain in the next section).
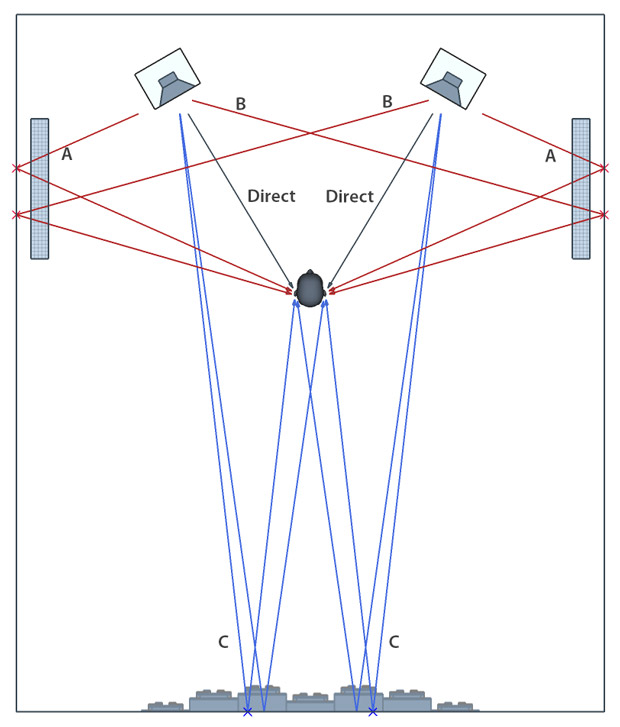
To decide which reflection points absolutely need treatment, measure the difference in travel distance for the direct sound (speaker to your ear) vs the reflected sound (speaker to reflection point to ear).
Subtract the first from the second to calculate the path length difference. The difference should be at least 17 feet to meet the EBU and ITU standards for a reflection-free zone.
Example path difference calculations (using room layout shown above)
Path A – Direct Path = 14′ – 6′-5″ = 7′-7″
This is less than 17′, so the sidewall reflection points must be treated.Path C – Direct Path = 29′-7″ – 6′-5″ = 23′-2″
This is greater than 17′, so we can meet the RFZ requirements without treating this point. But I still recommend treatment here (diffusion and/or broadband bass absorption, depending on your goals) because rear wall reflections are so influential to your sound.An untreated rear wall can create problems like slapback echo (not to mention bass nulls caused by comb filtering).
Pro Tip: Using the Initial Time Delay Gap to design your optimal RFZ
The holy grail of listening is to have your playback system reproduce the localization cues of a live performance — and the spatial impression of the performance space.
Let’s see how to achieve this with a reflection-free zone!
The goal is to create a long enough delay between the direct sound you hear from your speakers, and the first order reflections produced by your room.
This delay is called the initial time delay gap (ITDG) or initial signal delay (ISD) gap. To distinguish the two I’ll use ITDG when referring to the delay you’d perceive in a live performance hall, and ISD gap when referring to the delay in your playback room.
Digital reverb processors have a pre-delay time parameter to model the ITDG.
Your brain uses this cue to estimate the distance to the sound source. If you hear a longer ITDG, you perceive the source as closer (as shown in the animation below).
Naturally, if your playback room doesn’t let you hear the recorded ITDG, the reproduced recording will lack intimacy.
To reproduce the true sense of depth and intimacy, the ISD gap in your playback room should be longer than the ITDG that was recorded.
In other words, the ISD gap in your room should let you hear the first reflections encoded in your media, before the first reflections in your room.
Secret Insight: Most world class concert halls have ITDG values between 12 and 25 milliseconds (about 20 ms in the highest rated halls).
We can use this insight when creating the RFZ in your playback room. Most recording studio control rooms are designed around the RFZ concept, and the ISD gap is an important part of the design:
For a RFZ control room, 20 milliseconds is a good minimum ISD gap target. Sound travels about 22.5 feet in 20 ms. This means after the direct sound wave passes your ears, you need to either treat it or let it travel an extra 22.5 feet before it returns to your ears as a first reflection.
The easiest way to achieve this is to use absorption on your sidewall and ceiling first reflection points, then use a diffusive rear wall to create the ISD gap. In this case you can provide the minimum 20 ms ISD gap by sitting 11.25 feet from your rear wall.

This lets you listen to music that was recorded in world class performance halls, and hear the hall’s ITDG in your playback room!
And it means with the right speaker setup, you can perceive the spatial characteristic of the hall with stunning realism… a true sense of width and depth, as if you’re there in person. Now that’s what I call high fidelity reproduction.
It would be epic if all listening rooms and home studios could achieve this, but many domestic sized rooms lack the space. In a small room, you can still create a reflection-free zone using the EBU / ITU criteria explained earlier (i.e., using the Haas effect).
But if your room is small and you’re a rebel who refuses to meet the demands of the Haas effect, aim for an ISD gap of at least 10-12 ms, and make sure those first reflections are nicely diffused (treatment tips in the next section).
Ignore the reflection-free zone criteria at your own peril: While high levels of diffused reflections that arrive early may sound okay in listening rooms, you can forget about making mixes that translate well.
What type of acoustic panels should I use to treat my first reflection points?
How do you choose the best acoustic panels for treating your first reflection points? It depends on the listening experience you want to create.
Absorption on the side walls focuses the soundstage and improves imaging, while reflective or diffusive side walls give a wider sound, with less precise imaging.
Broadband absorption
The easiest and cheapest way to create a reflection-free zone is with broadband absorption. Example materials are Rockwool, Owens Corning 703 / 705 fiberglass panels, high density acoustic foam, Bonded Logic Ultratouch insulation (made from recycled denim).
If you have the budget, consider mounting broadband bass traps at your first reflection points.
On a tight budget, 4-inch thick Rockwool or rigid fiberglass acoustic panels will get the job done. 2-inch thick panels are an absolute minimum. You typically want material with a density of 3 to 6 lb/ft2.
In most cases you’re better off with thicker panels (e.g., 8 inches +) because they absorb to lower frequencies. If you’re creating a hardcore critical listening room (e.g., pro control room), you can go as thick as 14-20 inches!
If you want to get sophisticated and you know the lowest frequencies you want to target, try designing your own broadband absorbers with this multi-layer absorber calculator.
Broadband absorption is the most common RFZ treatment in control rooms and home studio mixing rooms, but it’s not the best approach in all rooms.
Diffusing early reflections
In listening rooms and home theaters, many audiophiles prefer subtle, diffuse early reflections. To achieve this, a combination of absorption and diffusion can be used at the first reflection points. This can sound natural and enveloping, but often comes at the cost of clarity.
What if your hi-fi room is to small too meet the RFZ criteria using diffusion? Can you still achieve an airy sounding room?
Yes, but there is a trade off between imaging and spaciousness. Diffusers can be used on the side walls to widen the soundstage, but you will loose focus and clarity if diffused energy arrives too early without enough attenuation.
… And lateral imaging is not the only thing at stake. Remember: when the ISD gap in your room is too short, you sacrifice intimacy, depth and realism.
A good compromise is hybrid absorber-diffuser surfaces like the RPG BAD Arc panel. When used at sidewall reflection points, hybrid surfaces let you attenuate reflections to meet the RFZ criteria, while providing subtle diffusion for an increased sense of width.

Reflection point treatment guidelines for various rooms
Side wall first reflection points treatment
Minimum for all rooms: 2-inch thick absorptive acoustic panels (4-6 inches is better).
Studio control rooms: Ideally >7-inch thick broadband absorption, or broadband bass traps.
Hi-fi listening rooms: Typically a combination of absorption and diffusion.
Home theaters: Typically a combination of absorption and diffusion.
Ceiling first reflection points treatment
Minimum: 2-inch thick absorptive panels or acoustic ceiling tiles (4-6 inches is better).
Studio control rooms: Typically a ceiling cloud or a thick, broadband absorptive ceiling that provides bass trapping.
Hi-fi listening rooms: It depends on your goals but a combination of absorption and diffusion is popular.
Home theaters: Typically a combination of absorption and diffusion.
Rear wall first reflection points treatment
Minimum for all rooms: 2-inch thick absorptive acoustic panels (4-6 inches is better).
Studio control rooms: Ideally bass absorbers to reduce nulls caused by bass waves reflecting off the wall behind you. Professional control rooms often use broadband bass absorption systems over 12 inches thick on the rear wall. Most control rooms also use diffusers if the rear wall is at least 10 feet from the listening position (to provide a nice ISD gap). Rear wall diffusion is standard in RFZ and LEDE control rooms, while THICK broadband absorption is standard in NE (Non-Environment) control rooms.
Hi-fi listening rooms: Typically a combination of absorption and diffusion. Pure diffusion is also common.
Home theaters: Typically a combination of absorption and diffusion.
The above are just guidelines. To determine the best first reflection point treatments for your room, consider a room acoustics assessment.
Do I need absorption on the front wall?
Whether or not you’ll benefit from front wall absorption depends on the directionality of your speakers (i.e., the off axis response), and how far your speakers are from the wall.
If you’re using bipolar speakers, which radiate equally forward and backward, then yes… treat your front wall first reflection points.
But most speakers are highly directional at mid-high frequencies. Above about 500 Hz, they don’t radiate much energy backward. At these frequencies, you can leave your front wall first reflection points untreated.
If after treating your room it still sounds too lively, or if you have slap / flutter echo problems, then front wall broadband absorption is worth considering.
But what about the low end? All speakers are omnidirectional at low frequencies, but bass energy is harder to absorb. If your speakers are close to the wall, you may benefit from thick absorption or bass traps behind them. But your first priority is to treat your front corners with bass traps.
Now go forth and conquer those first reflection points!
A quick recap…
If your room is already built, the mirror trick is an easy way to find your first reflection points. Otherwise, you can use ray tracing, illustrated in Chapter 8 of Sound Reproduction by Floyd Toole, and fully explained in Room Acoustics by Heinrich Kuttruff
.
Once you’ve found your first reflection points, use the EBU and ITU reflection-free zone guidelines to find out which ones you need to treat.
By understanding the initial signal delay gap and Haas effect you can get more sophisticated when creating your RFZ:
- For accurate imaging, the first major reflection that reaches your ears should not fall within the Haas interval. This means the direct sound from your speakers should reach your ears at least 15 ms before the reflected. If a reflection arrives before that it should be treated to at least 10 dB below the direct signal.
- For accurate reproduction of a recorded space, the ISD gap in your playback room should be longer than the ITDG that was recorded.
To learn more about the Haas effect and ISD gap see Floyd Toole’s book, Sound Reproduction: The Acoustics and Psychoacoustics of Loudspeakers and Rooms.
The choice of treatment depends on your room and your listening goals. For maximum clarity when critical listening, control rooms and mastering studios tend to use mostly broadband absorption at the first reflection points (with diffusion often added to the rear wall).
But in hi-fi listening rooms and home theaters it’s common to see some diffusion used at all reflection points.
When the choice is not obvious, it’s best to use acoustic measurements to help inform your decision. If you need help with measurements and choosing acoustic panels for your reflection points, hit me up for a room acoustics analysis.
And there you have it! Follow these steps and you will notice improved imaging and a giant boost in clarity and definition. Combine this with smart speaker layout and bass trapping, and you can create a beautifully layered soundstage with a natural sense of width and depth.
The result? A room that lets you reproduce the spatial impression of your media and placement of sound sources with stunning realism.
If you’re a music producer or audio engineer, that means easier critical listening and mixes and masters that translate better.
If you’re an audiophile, that means you’re one step closer to high fidelity heaven.
| < Bass Trap Placement Guide | Acoustic Treatment Layout > |
Do you know someone who might find this guide useful? If so, please share it :-)
by Tim Perry
